Welcome to emWave2 – Handheld
To set the date and time on your handheld unit, do a quick sync to the emWave 2 software.
4. Appendix 1
5. Appendix 2
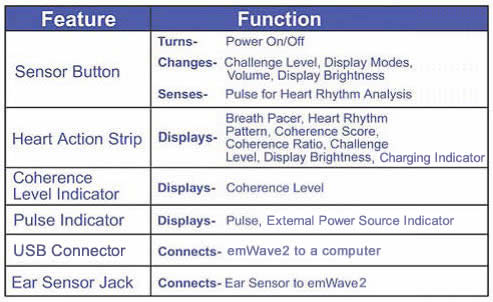
emWave2 Features
- Charge emWave2 for at least 2 hours
- While the unit is charging and before proceeding you may wish to watch the instructional videos here
- Please review the battery FAQ’s in Appendix 2 to maximize use efficiency
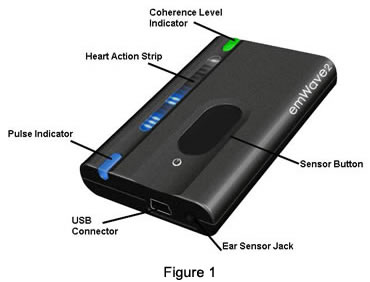
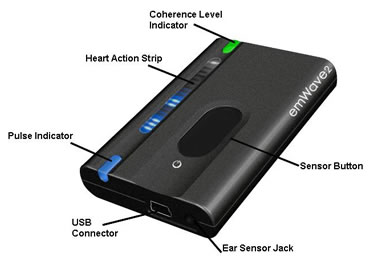
- Plug in ear sensor into ear sensor jack (see Figure 1 above)
- Pull lapel clip toward sensor (approximately 6-10″ away from sensor)
- Remove earrings (if applicable)
- Attach ear sensor to ear lobe
- Attach lapel clip to collar or shirt so that it won’t pull on the ear sensor
- Avoid sudden movements to ensure an accurate reading from the ear sensor
- Get comfortable in a quiet place or with soothing music
Note: Sensor works best when the ear lobe being used is warm.
- Powering-on your emWave2 handheld device
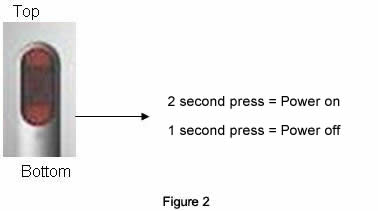
- Press for 2 seconds on the bottom of the sensor button (see Figure 2)
- Lights will be flashing for a few seconds while the emWave2 device does a self test.
- Ensure pulse is detected as seen by flashing blue pulse indicator light (see Figure 1 above)
- The emWave2 handheld device calibrates the pulse within 10-20 pulses
- If pulse indicator glows red or is blank, adjust your finger on the device or the ear clip sensor until a pulse is detected and indicated by the flashing blue light.
- Beginning a session
- Session begins automatically once pulse is detected and calibrated
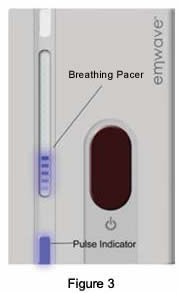
- The Heart Action Strip (see Figure 3) will have a blue light that rises and falls acting as a breath pacer
- Breathe in as the light rises
- Breathe out as the light falls
- Note: if the breath pace is too fast or too slow, just breathe comfortably. Within two minutes the breath pacer will adjust to your breathing rhythm
- Practice the Quick Coherence® Technique. This is a great way to stabilize your mind, body and emotions.
- Observe Coherence Level
- Coherence level is indicated by Coherence Level Indicator (see Figure 4)
- Red = low coherence
- Blue = medium coherence
- Green = high coherence
- Continue with heart focus, heart breathing and heart feeling for 3 – 10 minutes
- Breathe with breath pacer with goal of achieving medium or high coherence
- Breath pacer will automatically adjust to match your breathing pattern

- Coherence level is indicated by Coherence Level Indicator (see Figure 4)
- Power off the device when you would like to end your session
Press for 2 seconds on the bottom of sensor button (see Figure 2 above)
- Sync the emWave2 Handheld Device with Your Computer
Click here for complete instructions
Note: The emWave2 software does not support more than one user and can only be associated with a single handheld device. For multiple users and device support please use the emWave Pro software. However, each emWave2 handheld device can be used with multiple computers, so you can use it at home and at work. For maximum flexibility and added functionality, you can upgrade your software to emWave Pro, visit our online store for more information: http://store.heartmath.com/
Charging emWave2
The emWave2 is a USB device that synchronizes and charges through its USB port. You can use any powered USB port or USB charger to charge the device.
The emWave2 does not ship with a USB wall charger but they can be purchased separately either from HeartMath or other electronics resellers. A USB cable is included and serves the dual purpose of charging the emWave2 from the USB Port of a computer and providing the interface capability to the emWave software program.
To charge your emWave2 device, connect the unit to a powered up computer. To confirm proper connection, you must see 5 blue light bars at the bottom of the heart action strip. The 5 blue bars indicate charge status and connectivity. If the 5 blue bars are cycling up and down, the unit is charging. As the unit reaches a higher charge, the lights will begin to become solid. Once all 5 blue bars are solid (not blinking), your emWave2 device is fully charged. This process takes about 2 hours if starting with a fully drained battery.
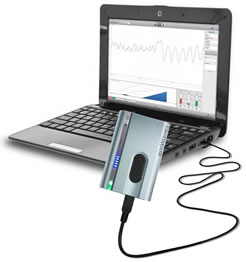
If you do not see 5 blue bars at the bottom of the heart action strip when connected to the computer, your unit is not properly connected and the battery is not receiving a charge. If this occurs, make sure your computer is fully powered up. If it has gone into sleep or hibernation mode, then power to the USB ports has stopped or been significantly reduced. If the computer is fully powered, try unplugging and plugging your emWave2 device back in or try a different USB port on the computer.
The emWave2 uses a high quality Lithium Ion rechargeable battery controlled by an onboard battery management micro controller.
emWave2 Modes:
The emWave2 handheld device has several modes and controls, allowing you to personalize your coherence training sessions. The modes include:
By default, when you power up your emWave2 device, it will go through setup mode for 15 – 30 seconds and then will automatically transition into Basic Mode.
Setup Mode
When you first power on your emWave2 handheld device you will hear two tones as the emWave2 is activated and a self – test is performed. During this phase it will cycle through the lights on the Heart Action Strip, Coherence Level Indicator and Pulse Indicator. After the self-tests are performed it will enter Setup Mode for approximately 15-30 seconds before automatically starting a session. While in Setup Mode you can make the following adjustments:
- Change the challenge level
- Change display brightness
- Enter Advanced Mode (We’ll cover this later)
- Power off the device
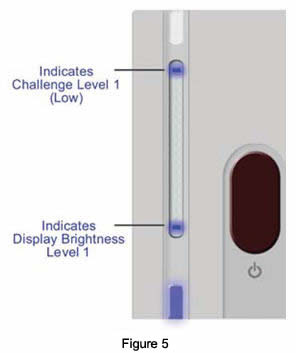
In Setup Mode there are 2 sets of blue lights on the Heart Action Strip. The lights at the top indicate the Challenge Level and the lights at the bottom indicate the Display Brightness (see Figure 5).
Important Hint: By default, the emWave2 is in the Basic mode. This mode is designated by two sound tones, when the device is turned on. If the handheld device is in Advanced Mode when you turn it on, then all of the Heart Action Strip Lights will flash brightly a couple times and you will also hear three different tones as the device is starting up. In Advanced mode, the emWave2 handheld device will open in the last mode that it was in when it was last turned off. In Basic mode, the emWave2 will not retain any sound, brightness or challenge levels.
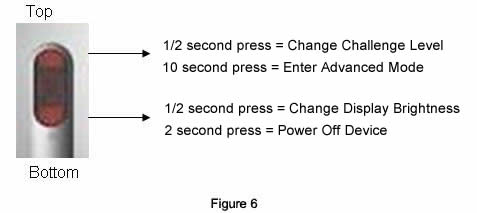
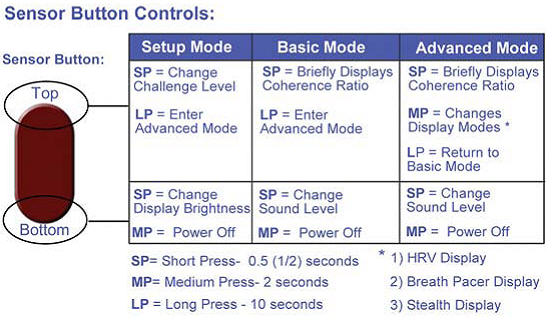
In Setup Mode the Sensor Button Controls are described in Figure 6.
Changing the Challenge Level
There are four Challenge Levels to choose from. Challenge Levels are associated with greater coherence, meaning that if you are in “high” coherence at Challenge Level 4, your overall coherence is stronger than if you are in “high” coherence in Challenge Level 3, 2 or 1. The Challenge Level default is level one (see Figure 7a). After powering-off the emWave2 device, the Challenge Level will be saved in Advanced Mode, but in Basic Mode the Challenge Level will revert back to Level 1 the next time the device is turned on.
To change the Challenge Level while in Setup Mode:
- A single 1/2 second press to the top portion of the sensor button will set it to Challenge Level 2 (see Figure 7b)
- Two 1/2 second presses to the top portion of the sensor button will set it to Challenge Level 3 (see Figure 7c)
- Three 1/2 second presses to the top portion of the sensor button will set it to Challenge Level 4 (see Figure 7d)
- Four 1/2 second presses to the top portion of the sensor button will set it back to Challenge Level 1 (see Figure 7a)

We recommend that you leave the Challenge Level on the default setting Challenge Level 1 (Low) for your first few sessions. When you can consistently keep the Coherence Level Indicator light glowing green, then you may want to increase the Challenge Level.
Please note that there is a 15% higher degree of challenge between Challenge Levels 1 and 2. And again between Challenge Levels 2 and 3. However, between Challenge Levels 3 and 4, there is a 30% higher degree of challenge.
Important Note: If your emWave2 device is turned off while in Basic Mode, the Challenge Level will default back to Challenge Level 1.
Changing the Brightness Level
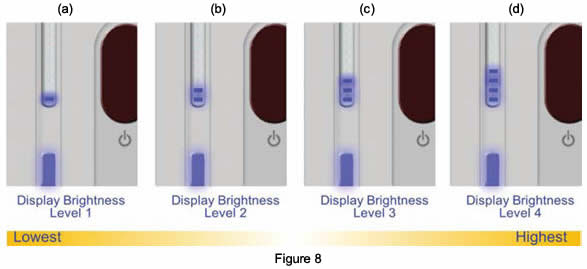
There are four Brightness Levels to choose from. The default Brightness Level is level one (see Figure 8a). The Brightness Level will be saved after you power off the device.
To change the Brightness Level while in Setup Mode:
- A single 1/2 second press to the bottom portion of the sensor button will set it to Brightness Level 2 (see Figure 8b)
- Two 1/2 second presses to the bottom portion of the sensor button will set it to Brightness Level 3 (see Figure 8c)
- Three 1/2 second presses to the bottom portion of the sensor button will set it to Brightness Level 4 (see Figure 8d)
- Four 1/2 second presses to the bottom portion of the sensor button will set it back to Brightness Level 1 (see Figure 8a)
Basic Mode
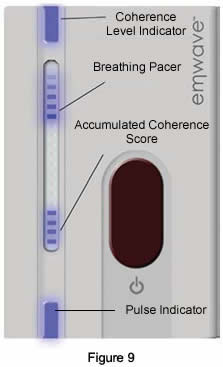
Once pulse calibration has completed (10 / 20 detected pulses) the emWave2 handheld device automatically starts an active session. Assuming you did not enter Advanced Mode (by pressing the top portion of the sensor button for 10 seconds), you will be in Basic Mode. During an active session, the Heart Action Strip will display the following (see Figure 9):
- Rising and falling blue lights will pace breathing in the Heart Action Strip.
- A second set of lights will display the Accumulated Coherence Score in the Heart Action Strip.
- You will see the Accumulated Coherence Score displayed in addition to the Breathing Pacer in the Heart Action Strip, while the Breathing Pacer continues to rise and fall.
- Your goal is to fill the Heart Action Strip with the Accumulated Coherence Score blue lights by sustaining Medium or High Coherence.
- When you have filled up the Heart Action Strip, all of lights that you have accumulated will disappear and be replaced by a single, brighter blue light and then begin to accumulate again. Additional “brighter” lights will be added as you complete each round.
Also while in Basic Mode you can:
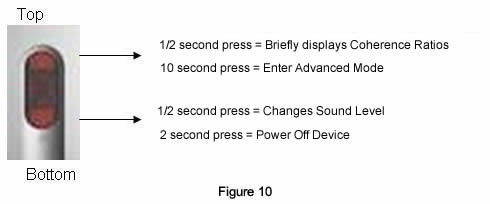
Below are the sensor button controls while in Basic Mode (see Figure 10):
Display the Coherence Ratios
The Coherence Ratios are the amount of time you have spent in low, medium and high coherence for the session (see Figure 11).
To view your Coherence Ratios while in Basic Mode:
- A single 1/2 second press to the top portion of the sensor button will cause the Coherence Ratios to be displayed on Heart Action strip (see Figure 11).
Referring to Figure 11, the Heart Action Strip is divided into three sections as noted. The lights are either fully lit or half lit.
- A light that is fully lit represents 20% of the time of your active session
- A light that is half lit represents 10% of the time of your active session
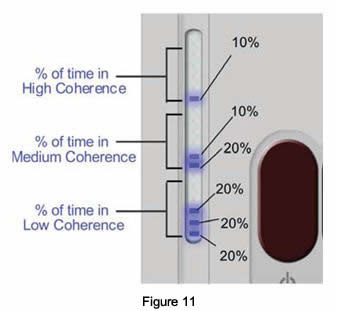
So in the picture above the lights would indicate that you have been in:
- Low Coherence for 60% of the time (3 fully lit lights x 20% = 60%)
- Medium Coherence for 30% of the time (1 fully lit plus 1 half lit light = 20% + 10% = 30%)
- High Coherence for 10% of the time (1 half lit = 10%)
Change the Sound Level
There are four sound levels to choose from:
- Low
- Medium
- High
- Mute (no sound)
To change the Sound Level while in Basic Mode, do a 1/2 second press to the bottom portion of the sensor button to toggle between the above four sound levels.
Power Off
The emWave2 handheld device will power off when:
- After you press the bottom portion of the sensor button for 2 seconds
- After approximately 45 seconds of not detecting a pulse
Note: when you turn off your emWave2 device while in Basic Mode, the Challenge Level will revert to the default level one. However, the Display brightness and Sound Level will be saved for future sessions. In Advanced Mode all of these settings will be saved.
Advanced Mode
Once you have become comfortable with the Basic Mode functionality of your emWave2 handheld device, you may want to learn and use the Advanced Mode which offers the following additional functionality:
- HRV Display Mode
- Stealth Display Mode
- Saves the Challenge Level when powering off the device
To enter Advanced Mode while in Basic Mode or Setup Mode:
- Press the top portion of the sensor button for 10 seconds
- As you enter Advanced Mode, you will hear 5 distinct tones in succession and the display will change to the default HRV Display Mode.
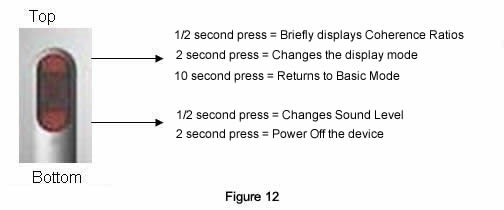
Below the sensor button controls for Advanced Mode are described (see Figure 12):
Changing the Display Mode
The Display Mode selected determines what is displayed on the Heart Action Strip during a session. There are 3 Display Modes to choose from:
- Breathing Pacer Display Mode (This is the only display option in Basic Mode)
- Stealth Display Mode
- HRV Display Mode
While in Advanced Mode, press the top portion of the sensor button for 2 seconds to toggle between the display modes listed above.
Breathing Pacer Display Mode
See description in the Basic Mode section. The moving light paces your breathing while your accumulated coherence score fills up the Heart Action Strip.
Stealth Display Mode
In Stealth Display Mode, both the Pulse Indicator and the Heart Action Strip are turned off. This mode is useful in situations where you do not wish to draw attention or to extend use between charging the battery.
HRV Display Mode
In the HRV Display, the sequence and timing of the moving lights follow your heart rhythm. The moving series of blue lights on the Heart Action Strip follows your heart rhythm as it speeds up and slows down in real-time. This is also described as the beat-to-beat variability in your heart rate, or heart rate variability (HRV). Unlike the Breathing Pacer, the HRV display is not programmed to rise and fall in a smooth rhythmic pattern, but reflects the detailed and real-time changes in your heart rate. When you are in High Coherence, your HRV pattern will be smooth and rhythmic. This is depicted on the emWave2 handheld device’s HRV Display as a smooth rising and falling blue light. Your goal is to create a smooth rising and falling blue light, indicating a highly coherent heart rhythm pattern.
Figure 13 shows the four HRV ranges on the Heart Action Strip. The emWave2 handheld device automatically changes its display to indicate your HRV range. It is the number of lights on the top and bottom of the Heart Action Strip that indicate the range of your HRV pattern. For example, if your range is 5 beats-per-minute (BPM) then you will see four blue lights at the top and bottom of the Heart Action Strip.
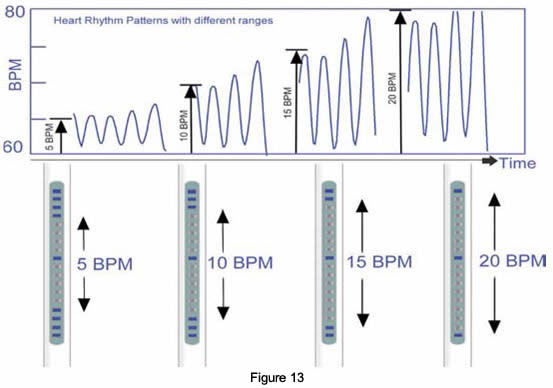
If your HRV range is higher at 20 BPM then you would see only one light at the top and bottom of the Heart Action Strip. The moving blue lights in the middle of the Heart Action Strip traces your HRV pattern, rising as your heart rate increases and falling as it decreases. These displays give you a better indication of your HRV range.
What is the HRV Range
The Heart Rate Variability (HRV) range reflects how much change occurs in your beat-to-beat variability. A higher range of variability can sometimes be an indicator of good health. Usually, the range of HRV naturally decreases as people age. Stress and negative feelings can cause the range of your HRV to temporarily decrease. Chronic stress can cause an overall reduction in your HRV range. You can learn to increase your HRV range as you practice obtaining new levels of coherence.
Because people have different ranges of HRV, the Heart Action Strip automatically scales its display to best fit your HRV range. The range is indicated by the number of lights on both ends of the Heart Action Strip. These range indicator lights are dimly lit, with the more brightly lit HRV wave moving up and down over them.
If you are in a stressful state, your HRV wave may not move as high and low (up and down) on the Heart Action Strip. It will hover more around the center indicating a lower range of HRV. Breathe more deeply if this happens and use the Quick Coherence® Technique.
Why Use the HRV Display?
Seeing your heart rate variability (HRV) displayed in real-time as you practice the Quick Coherence technique, can help you improve your Coherence Scores and increase your HRV range. Remember, HRV is an important indicator of physiological resilience and emotional flexibility. HRV coherence, or heart rhythm coherence, has the same physiological benefit as what’s commonly called the relaxation response. But it is much more than that. HRV coherence also improves your brain’s ability to process information, including decision-making, problem solving and creativity. HRV coherence improves memory, mental clarity and performance in learning or sports, including eye-hand coordination and reaction times. Over time, you will find it also increases your energy level.
Appendix 1
Appendix 2
The emWave2 handheld device uses a high quality Lithium Ion rechargeable battery controlled by an onboard battery management micro controller.
With one hour of use a day, we expect a lifetime of at least 5 years, providing it is recharged at least once a month, whether it has been used or not.
The battery is expected to have at least 85% of capacity after 500 full charge cycles. Our recommendations are true for almost all products with Lithium Ion Batteries thus: we recommend charging your emWave2 handheld device for 2 hours, right out of the box. There is no memory effect, you can start a charging cycle whenever you choose.
We do not recommend a deep discharge.
Since all batteries self discharge after some time we recommend running a recharge cycle at least once a month. If the emWave2 device is left unattended for 6 – 8 months or longer, the battery will deeply discharge on its own.
When plugged into a powered USB computer port or a USB wall charger (sold separately), the emWave2 handheld device’s power management will attempt to recover and recondition the battery. The symptom will be that the 5 LED’s at the bottom of the display will remain off, even if the unit has been on the battery charger for a long period of time. The procedure under these conditions are as follows:
- After a deep discharge, the unit will appear to be unresponsive and not display the normal charge indicator lights on the Heart Action Strip. Plug-in the USB computer cable or the USB wall charger and wait 15 – 20 minutes. Sometime during that time, you will see the LED indication. (If you do not, try unplugging the emWave2 device, wait for 20 – 30 minutes, and then plug it back in. Repeat 2 to 3 times if needed.)
- Complete the charge cycle once the normal battery charging indication has begun for 2 hours.
- Disconnect the emWave2 handheld device from the USB computer cable or the USB wall charger after charging for 2 hours. Again, for best performance, we recommend recharging the battery at least once a month, if the system is not used.
If the procedure above does not start the charging process, please contact HeartMath Technical Support from our support website at: https://www.heartmath.com/support/
Related Links:
emWave2 Handheld Videos: Training